In this article we present our first micropython example on a Raspberry Pi Pico, rather than just use the default example to flash an LED, we will connect an RGB led up to.
Tri-color LEDs contain three different LED emitters in one case. Each emitter is connected to a separate lead so they can be controlled independently. A four-lead arrangement is typical with one common lead (anode or cathode) and an additional lead for each color.
Others, however, have only two leads (positive and negative) and have a built-in electronic controller.
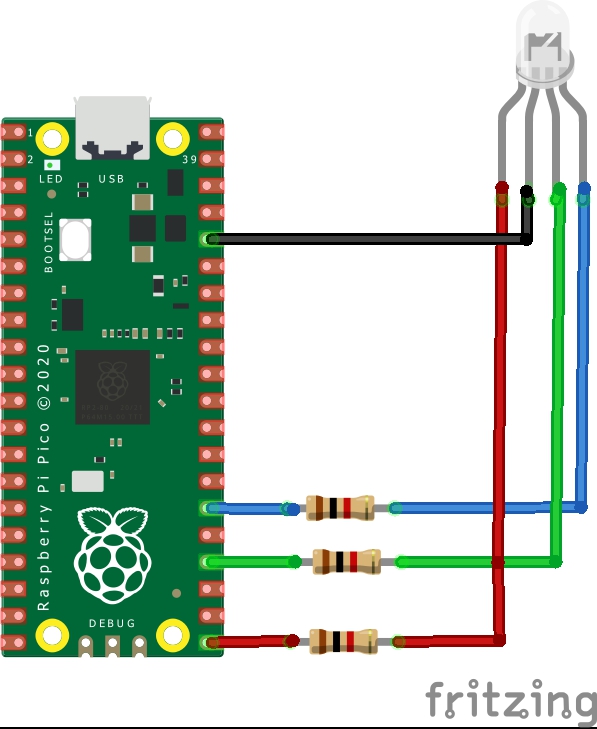
I used an RGB LED module, I find this is easier than using a breadboard with an RGB led and required resistors

Parts List
I used an expander with the raspberry pi pico fitted to it but you can quite easily connect and RGB led directly to the board with cables
| Name | Link |
| Raspberry Pi Pico | pimoroni |
| RGB Board | Full Color LED Module 10mm Bright RGB Board Electronic Building Blocks For Arduino |
| Connecting cables | Free shipping Dupont line 120pcs 20cm male to male + male to female and female to female jumper wire |
Layout
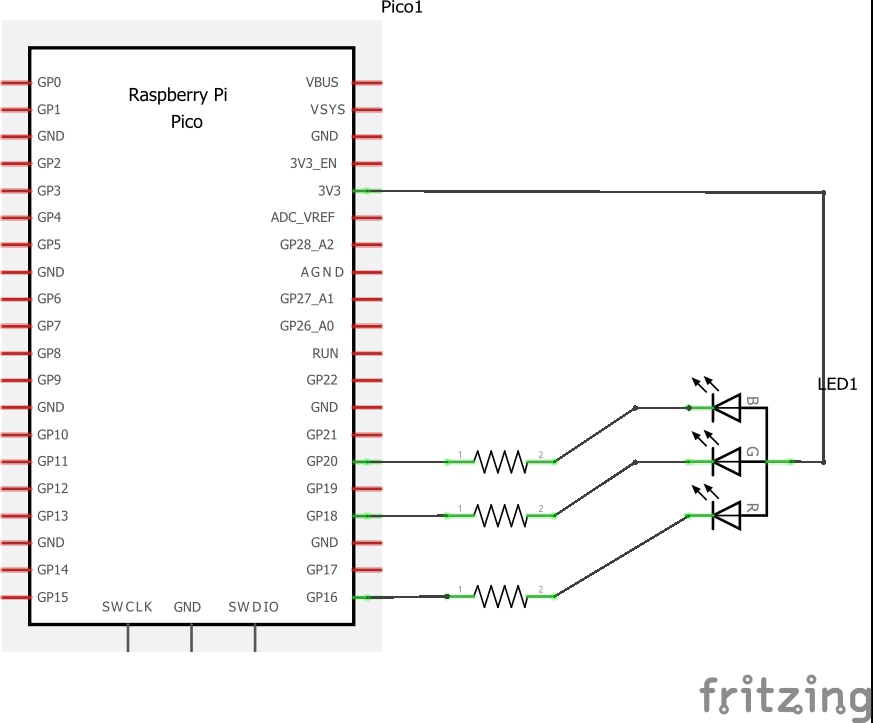
The schematics and layout shows 3 1K resistors, this is what my small module which you can see pictured above had built in. These are the individual components if you want to build this using individual components.
Code
I used the thonny IDE that supports Micropython on the Raspberry Pi Pico
The machine module is used to control on-chip hardware. This is standard on all MicroPython ports. Here we are using it to take control of a GPIO, so we can drive it high and low
We also include the utime module to bring in a basic delay
We then set the various pins to outputs like – red = Pin(18, Pin.OUT)
Now as we said this is a common anode rgb led, so to switch an individual led on you send a low (0) and to switch an led off you send a high (1). If you have a common cathode type the you need to reverse this.
So to switch the red led on you would send this – red.value(0)
To switch the red led off you would send this – red.value(1)
This first example switches all of the led off then back on again.
[codesyntax lang=”python”]
from machine import Pin
import utime

red = Pin(16, Pin.OUT)
green = Pin(18, Pin.OUT)
blue = Pin(20, Pin.OUT)

while True:
    red.value(1)
    green.value(1)
    blue.value(1)
    utime.sleep(1)

    red.value(0)
    green.value(0)
    blue.value(0)
    utime.sleep(1)
[/codesyntax]
This example switches the red led, green led and blue led off in sequence
[codesyntax lang=”python”]
from machine import Pin
import utime

red = Pin(16, Pin.OUT)
green = Pin(18, Pin.OUT)
blue = Pin(20, Pin.OUT)

while True:
    red.value(1)
    green.value(1)
    blue.value(1)
    utime.sleep(1)

    red.value(0)
    green.value(1)
    blue.value(1)
    utime.sleep(1)

    red.value(1)
    green.value(0)
    blue.value(1)
    utime.sleep(1)

    red.value(1)
    green.value(1)
    blue.value(0)
    utime.sleep(1)
[/codesyntax]
You can improve this for example by creating functions for the different led colours and maybe adding the other colours using different combinations of the red, green and blue values.