In this article we connect a LTR-559 3-axis Light and Proximity Sensor to the Raspberry Pi Pico
Sensor Information
This light and proximity sensor detects light over a wide dynamic range (0.01 lux to 64,000 lux) and proximity within a short range of ~5cm.
The LTR-559 is the same sort of sensor that you’d find next to the camera in your phone to detect when it’s next to your ear and when your phone should disable the touchscreen.
It’s ideal for an automatic and manual nightlight switch that detects when ambient light drops below a certain level and automatically triggers something to come on, or just wave your hand over it to toggle the light on or off manually using proximity sensing.
The LTR-559 Light and Proximity Sensor Breakout has an I2C interface and is 3.3V or 5V compatible. You can solder a piece of right-angle header onto it and then pop it straight onto the bottom left 5 pins on your Raspberry Pi’s GPIO header (pins 1, 3, 5, 7, 9).
Features
- Lite-On LTR-559ALS-01 sensor
- I2C interface (address: 0x23)
- IR/UV-filtering
- 50.60Hz flicker rejection
- 0.01 lux to 64,000 lux light detection range
- ~5cm proximity detection range
- 3.3V or 5V compatible
- Reverse polarity protection
Parts Required
The sensor you can pick up in the $6 price range – you can connect to the sensor using a standard header the classic dupont style jumper wire.
I used a Qwiic cable – since a few sensors seem to use these but this is optional
| Name | Link |
| Pico | Raspberry Pi Pico Development Board |
| LTR-559 | |
| Connecting cables | Aliexpress product link |
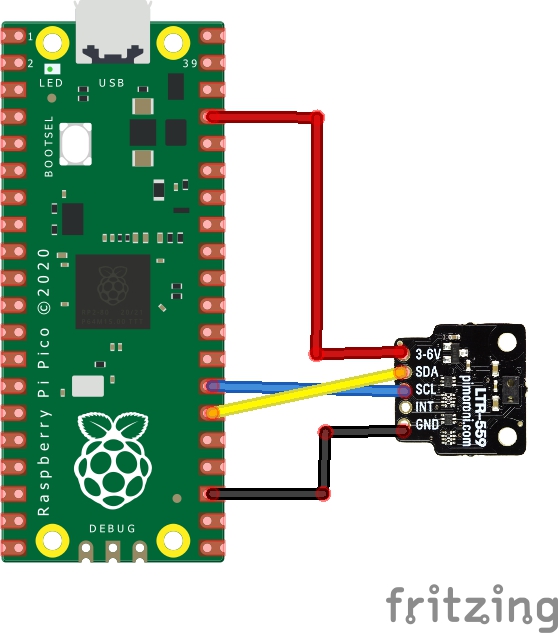
Schematic/Connection
I used the Pimoroni LTR-559 3-axis Light and Proximity Sensor and in this case used the Stemma connection
For the STEMMA QT cables, it uses the Qwiic convention:
Black for GND
Red for V+
Blue for SDA
Yellow for SCL
So color coded for ease of use, this layout shows a connection to the module
Code Example
I used Thonny for development and I am using micropython
You will need to download and install the latest micropython from pimoro
https://github.com/pimoroni/pimoroni-pico/blob/main/setting-up-micropython.md
This is the basic example
from pimoroni_i2c import PimoroniI2C
from breakout_ltr559 import BreakoutLTR559

PINS_BREAKOUT_GARDEN = {"sda": 4, "scl": 5}
PINS_PICO_EXPLORER = {"sda": 20, "scl": 21}

i2c = PimoroniI2C(**PINS_PICO_EXPLORER)
ltr = BreakoutLTR559(i2c)

part_id = ltr.part_id()
print("Found LTR559. Part ID: 0x", '{:02x}'.format(part_id), sep="")

while True:
    reading = ltr.get_reading()
    if reading is not None:
        print("Lux:", reading[BreakoutLTR559.LUX], "Prox:", reading[BreakoutLTR559.PROXIMITY])

    time.sleep(1.0)
Output
Here is what I saw in Thonny REPL window
Blocking and unblocking the sensor
MicroPython v1.20.0, pico v1.20.1 on 2023-04-28; Raspberry Pi Pico with RP2040
Type “help()” for more information.
>>> %Run -c $EDITOR_CONTENT
Found LTR559. Part ID: 0x09
Lux: 165.7634 Prox: 0
Lux: 165.7634 Prox: 0
Lux: 81.1074 Prox: 0
Lux: 0.0 Prox: 36
Lux: 0.0 Prox: 39
Lux: 0.0 Prox: 31
Lux: 40.7846 Prox: 0
Lux: 9.309 Prox: 0
Lux: 3.5486 Prox: 6
Links
https://learn.pimoroni.com/article/getting-started-with-pico
http://optoelectronics.liteon.com/upload/download/ds86-2013-0003/ltr-559als-01_ds_v1.pdf