In this article we look at display t he internal temperature of an RP2020 to an I2C 16×2 LCD to a raspberry Pi Pico
The internal temperature sensor that comes with the Raspberry Pi Pico is connected to one of the Analog-to-Digital Converters. The ADC pin supports a range of values, which is determined by the input voltage applied to the pin.
In the Raspberry Pi Pico Board, the ADC pins support 12-bits, which means that the value can go from 0 to 4095.
The MicroPython code though can scale the ADC values to a 16-bit range which means the range of values that are available are actually 0 to 65535. The microcontroller operates at 3.3 V, this means that an ADC pin will return a value of 65535 at 3.3 V or 0 when there is 0v. So with some simple code we can easily get the value which we can then display on an LCD
The temperature sensor does not connect to a physical pin on the board but is actually ADC4.
Parts Required
| Name | Link |
| Pico | Raspberry Pi Pico Development Board |
| I2C lCD | |
| Connecting cables | Aliexpress product link |
Schematic/Connection
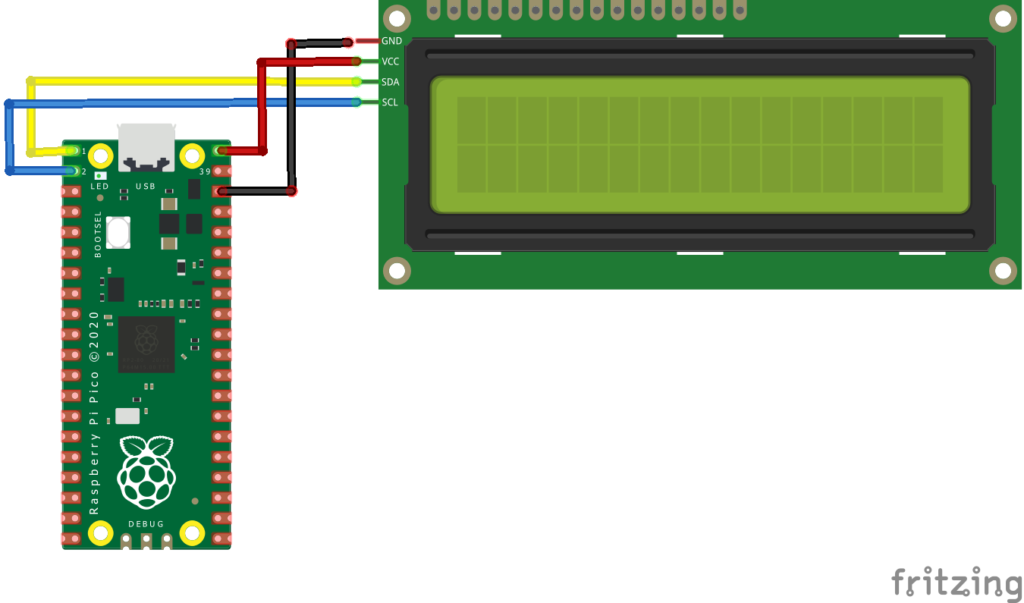
To connect the display to your Raspberry PI Pico requires just 4 wires, you just need to wire the Vcc and GND PINs from display to VBuS and a GND PINs of RPI Pico, then SDA and SCL PINs from the module to suitable SDA and SCL PINs from Raspberry PI Pico
Here is a layout in fritzing to show this

Code Example
I use thonny for all development
Now its important to verify the I2C address of your LCD
sdaPIN=machine.Pin(0)
sclPIN=machine.Pin(1)
i2c=machine.I2C(0,sda=sdaPIN, scl=sclPIN, freq=400000)
devices = i2c.scan()
if len(devices) == 0:
 print("No i2c device !")
else:
 print('i2c devices found:',len(devices))
for device in devices:
 print("Hexa address: ",hex(device))
You will see the I2C address in the REPL
You then need to copy 2 libraries to your Pico filesystem
In Thonny, go to top menu File => Save Copy => Raspberry Pi Pico and save each file to the board with the same name as downloaded and with a .PY extension when saving it to the board.
| https://github.com/T-622/RPI-PICO-I2C-LCD/blob/main/lcd_api.py |
| https://github.com/T-622/RPI-PICO-I2C-LCD/blob/main/pico_i2c_lcd.py |
Now that you have done all that, lets create a simple clock which will display the date on line 1 and the time on line 2
Now lets look a complete example
from machine import I2C,Pin,ADC #import libraries to handle Pins, I2C and ADC
from time import sleep
from lcd_api import LcdApi
from pico_i2c_lcd import I2cLcd

I2C_ADDR = 0x27
totalRows = 2
totalColumns = 16
#Internal Temperature sensor is connected to ADC 4
sensor_temp = ADC(4)
conversion_factor = 3.3/65535

#get temperature value from ADC 4 internal sensor
def get_temperature():
    reading = sensor_temp.read_u16() * conversion_factor
    temperature = 27 - (reading - 0.706)/0.001721
    return temperature

i2c = I2C(0, sda=machine.Pin(0), scl=machine.Pin(1), freq=400000)
lcd = I2cLcd(i2c, I2C_ADDR, totalRows, totalColumns)

#define a customized LCD icon for º (degree sign)
degree = bytearray([0x1c,0x14,0x1c,0x00,0x00,0x00,0x00,0x00])
#degree sign 'º' will be used as chr(0) in program
lcd.custom_char(0, degree)

while True:
    lcd.putstr("Temperature:\n"+str(get_temperature())+" C"+chr(0)) #display temperature to LCD
    sleep(4)
    lcd.clear()
Now keep in mind this is internal temperature for t he Rp2040 and will all likelihood not be the same as the ambient temperature of the surroundings. We will look at temperature sensors in future examples.
