In this article we look at creating and displaying custom characters on an I2C 16×2 LCD to a raspberry Pi Pico
Parts Required
| Name | Link |
| Pico | Raspberry Pi Pico Development Board |
| I2C lCD | |
| Connecting cables | Aliexpress product link |
Schematic/Connection
To connect the display to your Raspberry PI Pico requires just 4 wires, you just need to wire the Vcc and GND PINs from display to VBuS and a GND PINs of RPI Pico, then SDA and SCL PINs from the module to suitable SDA and SCL PINs from Raspberry PI Pico
Here is a layout in fritzing to show this

Character generation
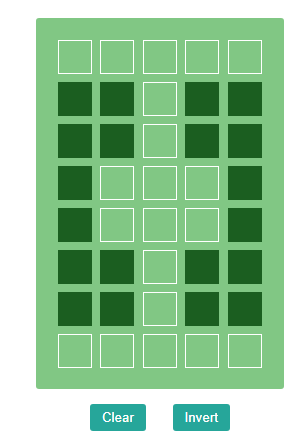
You need to visit https://maxpromer.github.io/LCD-Character-Creator/
In the interfacing option select I2C and in the data type option select hex
Then go and design your characters by clicking the various boxes, you can see an example that I designed in this image.
Code Example
I use thonny for all development – we have kept this information from our 16×2 LCD article
Now its important to verify the I2C address of your LCD
import machine
sdaPIN=machine.Pin(0)
sclPIN=machine.Pin(1)
i2c=machine.I2C(0,sda=sdaPIN, scl=sclPIN, freq=400000)
devices = i2c.scan()
if len(devices) == 0:
 print("No i2c device !")
else:
 print('i2c devices found:',len(devices))
for device in devices:
 print("Hexa address: ",hex(device))
You will see the I2C address in the REPL
You then need to copy 2 libraries to your Pico filesystem
In Thonny, go to top menu File => Save Copy => Raspberry Pi Pico and save each file to the board with the same name as downloaded and with a .PY extension when saving it to the board.
| https://github.com/T-622/RPI-PICO-I2C-LCD/blob/main/lcd_api.py |
| https://github.com/T-622/RPI-PICO-I2C-LCD/blob/main/pico_i2c_lcd.py |
In this example we display the 3 custom characters that we designed earlier
We use this command
lcd.custom_char(Num, bytearray([HEX chars]))) – Num can be any integer 0 – 8 (Writing to CGRAM locations) merely used for numbering.
import utime

from machine import I2C
from lcd_api import LcdApi
from pico_i2c_lcd import I2cLcd

I2C_ADDR     = 0x27
I2C_NUM_ROWS = 2
I2C_NUM_COLS = 16

i2c = I2C(0, sda=machine.Pin(0), scl=machine.Pin(1), freq=400000)
lcd = I2cLcd(i2c, I2C_ADDR, I2C_NUM_ROWS, I2C_NUM_COLS)

#clear screen
lcd.clear()
lcd.custom_char(0, bytearray([0x1F,
  0x0E,
  0x04,
  0x1F,
  0x1F,
  0x04,
  0x0E,
  0x1F]))
lcd.custom_char(1, bytearray([0x1F,
  0x04,
  0x04,
  0x0E,
  0x0E,
  0x04,
  0x04,
  0x1F]))
lcd.custom_char(2, bytearray([0x00,
  0x1B,
  0x1B,
  0x11,
  0x11,
  0x1B,
  0x1B,
  0x00]))
lcd.move_to(0,0)
lcd.putchar(chr(0))
lcd.move_to(1,0)
lcd.putchar(chr(1))
lcd.move_to(2,0)
lcd.putchar(chr(2))
utime.sleep(5)
Links