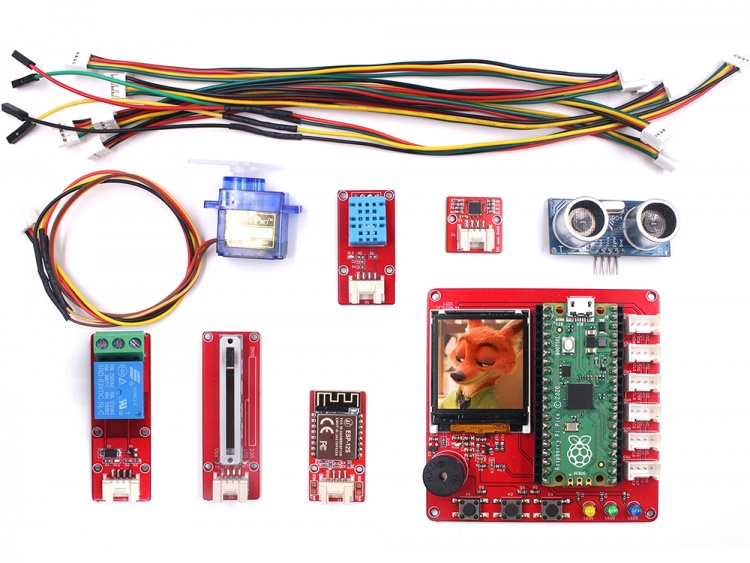
In this article we look at an Rp2040 kit from makerfabs. This is the kit that you get
You get an expansion board for the Rp2040, this is pictured below. It has a few interesting features
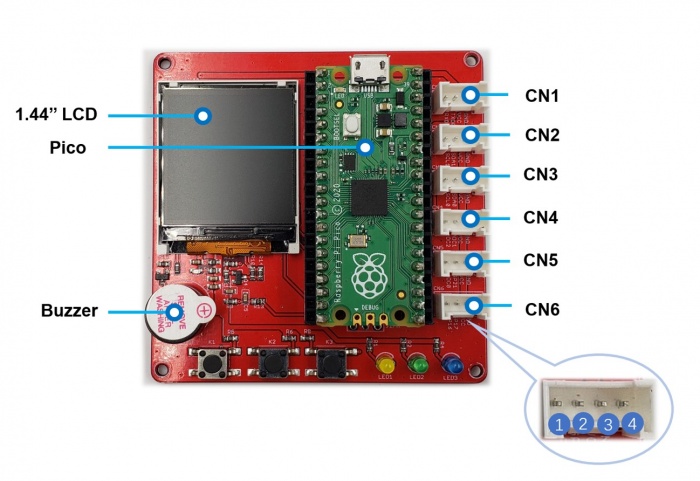
The board has 3 buttons and 3 colored LEDs, a buzzer and a 1.44 inch TFT LCD which uses a ST7735 driver, these use the following GPIO pins
| BUTTON | GPIO |
| K1 | GP2 |
| K2 | GP3 |
| K3 | GP22 |
| LED | GPIO |
| LED1 | GP18 |
| LED2 | GP19 |
| LED3 | GP20 |
| Active buzzer | GP4 |
And the expansion board also has the following 6 connectors
| Interface | 1 | 2 | 3 | 4 |
| CN1 | GP1 | GP0 | VCC | GND |
| CN2 | GP7 | GP6 | VCC | GND |
| CN3 | GP9 | GP8 | VCC | GND |
| CN4 | GP28 | GP27 | VCC | GND |
| CN5 | GP26 | GP21 | VCC | GND |
| CN6 | GP16 | GP17 | VCC | GND |
You get the following boards and modules
6 Axis IMU MPU6050
DHT11 Sensor
Relay 10A
WS2812 module with 8 RGB leds
Servo SG90
Slide Potentiometer
Serial WiFi based on an ESP
Ultrasonic distance module based on an HC-SR04
There are a number of code examples in the github link using the various modules and expansion board functionality
This is a nice kit, the expansion board is very useful and you get the required cables to connect from the expansion board to the individual sensors and modules.
Code examples
The following examples are in the github link, there are the necessary libraries and everything works well in Thonny
project-1-display_led_button.py
Control onboard leds via buttons. And display status on TFT screen. Don’t need any module
project-2-leveling.py
Simple graphic level, read inclination angle with MPU6050. Insert MaBee MPU6050 to CN3
project-3-adc_display.py
The voltage value of the read slide potentimeter is displayed on the screen Insert MaBee Slide Potentimeter to CN5
project-4-weather_8266.py
Connect to WiFi through ESP8266 module and get the weather. Insert MaBee 8266 to CN1 API from “api.openweathermap.org” is not stable, please try more and pay attention to the serial port information.
project-5-temperature .py
The temperature and humidity are obtained through DHT11 and displayed on the screen Insert MaBee DHT11 to CN6
project-6-HC-SR04_distance.py
The distance is captured by a HC-SR04 Ultra sensor and displayed on the screen Insert SharpIR to CN6
project-7-servo_control.py
Use button control servo and MaBee relay Insert Servo to CN6 Insert MaBee Relay to CN5
project-8-ws2812.py
Insert WS2812 to CN6
project-10-CO2.py
Mabee CO2 message display and run a webserver.
Insert Mabee CO2 to CN3, sda to GPIO8, scl to GPIO9
Links
I bought mine from Tindie but the main page is located at https://www.makerfabs.com/raspberry-pi-pico-primer-kit.html?limit=72
It costs around $38 and is very good value for money