In this article we look at a development board from Pimoroni for creating your projects. This is called the pico explorer and its an ideal board for beginners with a few nice features for starting out with the Raspberry Pi Pico
There are a few examples in Micropython and C++ available for testing out, you can download a uf2 file and all the libraries and using an IDE such as Thonny copy and paste one of the examples and run them.
Lets look at some of the features of the board
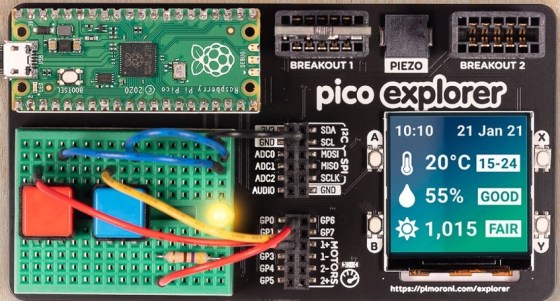
There is a motor driver chip on the underside of the board, it is a DRV8833 which can power 2 motors these connections come out the bottom 6×2 connector – next to that connector you can see there is an LED, this is used to tell you when there is an over current situation.
There is also a piezo buzzer which again can be used, you need to allocate an I/O pin and then connect a jumper between the pin on the connector to the pin named AUDIO. You can see this in the image above.
There is also a 240 x 240 display fitted which is controlled by a ST7789 chip and beside this are 4 buttons which can be used by the user.
There is a small mini breadboard attached to the main board which you can use for prototyping. You can connect components like switches, leds and wires to this.
There are 2 different types of connectors – 2 6 x 2 connectors and 2 connectors for Pimoroni’s breakout garden I2C sensor connection. There are several sensors that you can buy that can use this already.
Lets look at the pins that these all use
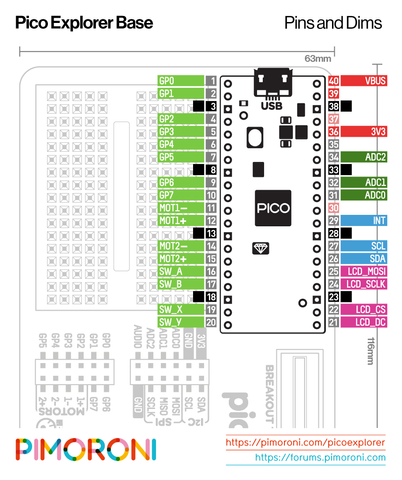
explorer base
Features
- Pico Explorer Base
- Piezo speaker
- 1.54″ IPS LCD screen (240 x 240)
- Four user-controllable switches
- Two Half-Bridge motor drivers with over current indicator LED
- Easy access GPIO and ADC pin Headers
- Two Breakout Garden I2C sockets
- Mini breadboard
Purchase
The board costs about £22 and you can buy directly from Pimoroni in the UK – https://shop.pimoroni.com/products/pico-explorer-base
Code
There are a couple of code examples that I could find, to make things easy Pimoroni have created firmware with all of their libraries already installed, you can get this from – https://github.com/pimoroni/pimoroni-pico/releases
This is a demo example – there are several examples from the link at the end.
I used this to test the board out
[codesyntax lang=”python”]
import time
import picoexplorer as explorer

width = explorer.get_width()
height = explorer.get_height()

display_buffer = bytearray(width * height * 2)  # 2-bytes per pixel (RGB565)
explorer.init(display_buffer)

explorer.set_audio_pin(0)

i = 1

while True:
    explorer.set_pen(120, 40, 60)
    explorer.clear()

    adc0 = int(explorer.get_adc(0) * 120)
    adc1 = int(explorer.get_adc(1) * 120)
    adc2 = int(explorer.get_adc(2) * 120)

    explorer.set_pen(255, 255, 255)

    explorer.text("ADC0:", 20, 20, 100)
    explorer.text("ADC1:", 20, 40, 100)
    explorer.text("ADC2:", 20, 60, 100)

    explorer.set_pen(adc0 * 2, 0, 0)
    explorer.circle(90 + adc0, 26, 10)

    explorer.set_pen(0, adc1 * 2, 0)
    explorer.circle(90 + adc1, 46, 10)

    explorer.set_pen(0, 0, adc2 * 2)
    explorer.circle(90 + adc2, 66, 10)

    # example for the on-board A/B/X/Y buttons
    if explorer.is_pressed(explorer.BUTTON_A):
        explorer.set_pen(255, 255, 255)
        explorer.text("Button A pressed", 20, 110, 200)
    elif explorer.is_pressed(explorer.BUTTON_B):
        explorer.set_pen(255, 255, 255)
        explorer.text("Button B pressed", 20, 110, 200)
    elif explorer.is_pressed(explorer.BUTTON_X) and explorer.is_pressed(explorer.BUTTON_Y):
        explorer.set_pen(255, 255, 255)
        explorer.text("Buttons X and Y pressed", 20, 110, 200)
    elif explorer.is_pressed(explorer.BUTTON_X):
        explorer.set_pen(255, 255, 255)
        explorer.text("Button X pressed", 20, 110, 200)
    elif explorer.is_pressed(explorer.BUTTON_Y):
        explorer.set_pen(255, 255, 255)
        explorer.text("Button Y pressed", 20, 110, 200)
    else:
        # no button press was detected
        explorer.set_pen(255, 255, 255)
        explorer.text("Plug a jumper wire from GP0 to AUDIO to hear noise!", 20, 110, 200)

    explorer.set_tone(i)

    if i > 600:
        explorer.text("Motor 1: Forwards", 20, 180, 200)
        explorer.set_motor(0, 0, 1)
    else:
        explorer.text("Motor 1: Backwards", 20, 180, 200)
        explorer.set_motor(0, 1, 1)

    if i > 600:
        explorer.text("Motor 2: Forwards", 20, 200, 200)
        explorer.set_motor(1, 0, 1)
    else:
        explorer.text("Motor 2: Backwards", 20, 200, 200)
        explorer.set_motor(1, 1, 1)

    i = i + 20
    if i > 1000:
        i = 1

    explorer.update()
    time.sleep(0.01)
[/codesyntax]
This is another great example which shows the temperature of the Pico on the display every 5 seconds – I used this one next.
[codesyntax lang=”python”]
# This example takes the temperature from the Pico's onboard temperature sensor, and displays it on Pico Explorer, along with a little pixelly graph.
# It's based on the thermometer example in the "Getting Started with MicroPython on the Raspberry Pi Pico" book, which is a great read if you're a beginner!

import machine
import utime

# Pico Explorer boilerplate
import picoexplorer as display
width = display.get_width()
height = display.get_height()
display_buffer = bytearray(width * height * 2)
display.init(display_buffer)

# reads from Pico's temp sensor and converts it into a more manageable number
sensor_temp = machine.ADC(4)
conversion_factor = 3.3 / (65535)

i = 0

while True:
    # the following two lines do some maths to convert the number from the temp sensor into celsius
    reading = sensor_temp.read_u16() * conversion_factor
    temperature = round(27 - (reading - 0.706) / 0.001721)

    # this if statement clears the display once the graph reaches the right hand side of the display
    if i >= (width + 1):
        i = 0
        display.set_pen(0, 0, 0)
        display.clear()

    # chooses a pen colour based on the temperature
    display.set_pen(0, 255, 0)
    if temperature > 20:
        display.set_pen(255, 0, 0)
    if temperature < 13:
        display.set_pen(0, 0, 255)

    # draws the reading as a tall, thin rectangle
    display.rectangle(i, height - (temperature * 6), 6, height)

    # draws a white background for the text
    display.set_pen(255, 255, 255)
    display.rectangle(1, 1, 65, 33)

    # writes the reading as text in the white rectangle
    display.set_pen(0, 0, 0)
    display.text("{:.0f}".format(temperature) + "c", 3, 3, 0, 4)

    # time to update the display
    display.update()

    # waits for 5 seconds
    utime.sleep(5)

    # the next tall thin rectangle needs to be drawn 6 pixels to the right of the last one
    i += 6
[/codesyntax]
In future projects I will connect other environmental sensors to this board and display the results on the display