The Seeed Studio XIAO RP2040 is a mini development board based on the Dual-core RP2040 processor.
The Seeed Studio XIAO RP2040 also has 264KB of SRAM, and 2MB of on-board Flash memory which can provide more program to save and run. On the other hand, this little board has good performance in processing but needs less power.
The board is a thumb sized 20 x 17.5mm and can be used for wearable devices and small projects.
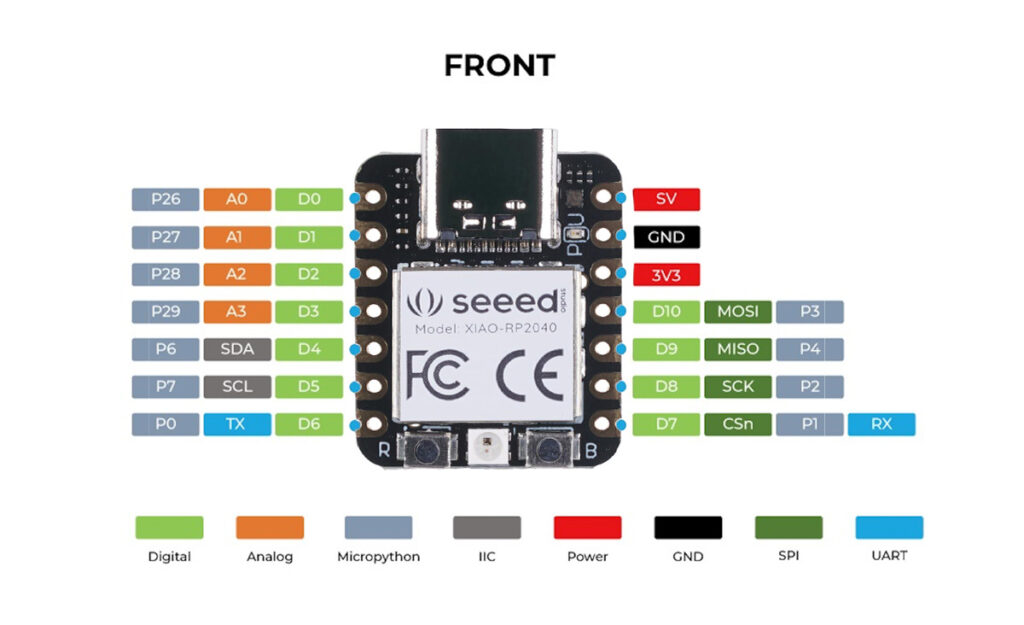
There Seeed Studio XIAO RP2040 has 14 GPIO PINs, of which there are 11 digital pins, 4 analog pins, 11 PWM Pins,1 I2C interface, 1 UART interface, 1 SPI interface.
Specifications
| CPU | Dual-core ARM Cortex M0+ processor, flexible clock running up to 133 MHz |
| Storage | 264KB of SRAM, and 2MB of onboard Flash memory |
| I/O PINs | 11 digital pins, 4 analog pins, 11 PWM Pins |
| Interface | 1 I2C interface, 1 UART interface, 1 SPI interface, 1 SWD Bonding pad interface |
| Power supply & Downloading interface | USB Type-C interface |
| LEDs: | 1 user LED, 1 power LED, two LEDs for serial port downloading, 1 RGB LED |
| Button | 1 RESET button, 1 BOOT button |
| Power Pads | For the battery power supply |
| Software compatibility | Supports Micropython / Arduino / CircuitPython |
| Cover | Projection cover for protecting the circuit |
| Dimensions | 20 x 17.5 x 3.5 mm |
The I/O pins are rated at 3.3v, if you connect a higher voltage than that on these pins you can damage the RP2040.
Power is supplied via the USB type C
Development
The Rp2040 is supported by the Arduino IDE, MicroPython and CircuitPython from adafruit
Each of these has different ways for development but a good rule of thumb for MicroPython and Circuitpython is to use Thonny for development. You can use the IDE for both, upload and run your code and also debug.
Arduino Setup
- Step 1. Download and Install the latest version of Arduino IDE according to your operating system
- Step 2. Launch the Arduino application.
- Step 3. Open the Blink example by navigating “File → Examples —>01.Basics → Blink”
- Step 4. Add Seeed Studio XIAO RP2040 to your Arduino IDE
Navigate to File > Preference, and fill “Additional Boards Manager URLs” with the url below:
https://github.com/earlephilhower/arduino-pico/releases/download/global/package_rp2040_index.json
Navigate to Tools-> Board-> Boards Manager…, type the keyword “Seeed Studio XIAO RP2040” in the searching blank. Select the lastest version of “Seeed Studio XIAO RP2040” and install it.
- Step 5. Select your board and port
After installing the board package, navigate to Tools-> Board, find “Seeed Studio XIAO RP2040” and select it. Now we have finished setting up the Seeed Studio XIAO RP2040 for Arduino IDE.
Navigate to Tools > Port and select the serial port name of the connected Seeed Studio XIAO RP2040. This is likely to be COM3 or higher. The serial port of the connected Seeed Studio XIAO RP2040 usually contains parentheses that are written “Seeed Studio XIAO RP2040”.
Purchase
This only costs about £5, a bit of a bargain for what you can do with this board
| Aliexpress | Buy this here |