In this article we connect a TM1637 display module to a Raspberry Pi Pico and we will have some examples in Micropython
Module Information
A common display module that you can buy on the internet contain the Tm1638 driver chip, I was interested in this one which is the TM1637 which appears to be a more basic version which can only control a display, the TM1638 can also control LED’s, buttons and two displays at the same time.
This is a common anode 4-digit tube display module which uses the TM1637 driver chip; Only 2 connections are required to control the 4-digit 8-segment displays
Features of the module
- Display common anode for the four red LED
- Powered supply by 3.3V/5V
- Four common anode tube display module is driven by IC TM1637
- Can be used for Arduino devices, two signal lines can make the MCU control 4 8 digital tube. Digital tube 8 segment is adjustable
Parts Required
The TM1637 display module can be acquired for under $1
| Name | Link |
| Pico | Raspberry Pi Pico Development Board |
| TM1637 module | TM1637 Red Digital Tube LED Module |
| Connecting cables | Aliexpress linkAmazon.com link |
Schematic/Connection
Black for GND
Red for V+
Blue for DIO
Yellow for CLK
This layout shows a connection to the module
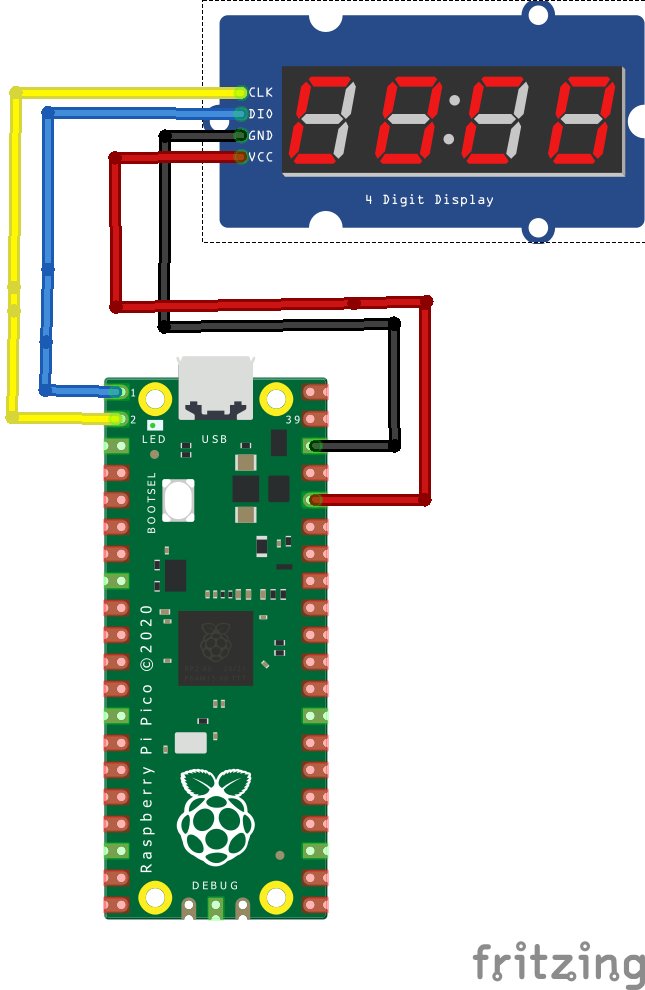
rp2040 and tm1637
Code Examples
I used Thonny for development
The following is based on this library which you can copy to your Raspberry Pi Pico – max7219 library
scrolling message
[codesyntax lang=”python”]
from machine import Pin
import utime
import tm1637

tm = tm1637.TM1637(clk=Pin(1), dio=Pin(0))

tm.brightness(2)

while True:
    tm.scroll('Hello World') # 4 fps
    utime.sleep(1)
    tm.scroll('Hello World', 1000) # 1 fps
    utime.sleep(1)
[/codesyntax]
Display some numbers
[codesyntax lang=”python”]
from machine import Pin
import utime
import tm1637

tm = tm1637.TM1637(clk=Pin(1), dio=Pin(0))

tm.brightness(2)

while True:
    # show "   1" (numbers right aligned)
    tm.number(1)
    utime.sleep(1)
    # show "  12"
    tm.number(12)
    utime.sleep(1)
    # show " 123"
    tm.number(123)
    utime.sleep(1)
    # show "1234"
    tm.number(1234)
    utime.sleep(1)
[/codesyntax]
A counter
[codesyntax lang=”python”]
from machine import Pin
import utime
import tm1637

tm = tm1637.TM1637(clk=Pin(1), dio=Pin(0))

tm.brightness(2)
tm.show('    ')

number = 0
while number < 1000:
    number += 1
    tm.number(number)
    utime.sleep(0.01)
[/codesyntax]
Usage example
[codesyntax lang=”python”]
from machine import Pin
import utime
import tm1637

tm = tm1637.TM1637(clk=Pin(1), dio=Pin(0))

tm.brightness(2)
tm.show('    ')

# all LEDS on "88:88"
tm.write([127, 255, 127, 127])
utime.sleep(1)
# all LEDS off
tm.write([0, 0, 0, 0])
utime.sleep(1)
# show "0123"
tm.write([63, 6, 91, 79])
utime.sleep(1)
# show "COOL"
tm.write([0b00111001, 0b00111111, 0b00111111, 0b00111000])
utime.sleep(1)
# show "HELP"
tm.show('help')
utime.sleep(1)
# display "dEAd", "bEEF"
tm.hex(0xdead)
tm.hex(0xbeef)
utime.sleep(1)
# show "12:59"
tm.numbers(12, 59)
utime.sleep(1)
# show "-123"
tm.number(-123)
utime.sleep(1)
# show temperature '24*C'
tm.temperature(24)
[/codesyntax]
The following are available according to the documents
Methods
Get or set brightness.
brightness(val=None)
Write one or more segments at a given offset.
write(segments, pos=0)
Convert a single hex digit (0x00-0x0f) to a segment.
encode_digit(digit)
Convert a string to a list of segments.
encode_string(string)
Convert a single character to a segment.
encode_char(char)
Display a number in hexadecimal format 0000 through FFFF.
hex(val)
Display a number -999 through 9999, right aligned.
number(num)
Display 2 independent numbers on either side of the (optional) colon, with leading zeros.
numbers(num1, num2, colon=True)
Display a temperature -9 through 99 followed by degrees C.
temperature(num)
Show a string on the display. Shorthand for write(encode_string()). Limited to first 4 characters.
show(string, colon=False)
Display a string on the display, scrolling from the right to left, speed adjustable. String starts off-screen and scrolls until off-screen at 4 FPS by default.
scroll(string, delay=250)
Links
Based on this library
https://github.com/mcauser/micropython-tm1637