In this article we connect the ever popular KX132 accelerometer to a raspberry Pi Pico and we will then display readings via the serial monitor window. We are using the Arduino IDE.
Lets look at the sensor first
Features
The KX132-1211 is silicon micromachined accelerometer in the 2 x 2 x 0.9 mm LGA package featuring up to 25.6 kHz ODR and wide bandwidth (4200Hz (XY), 2900Hz (Z)). I²C or SPI digital protocol is supported.
- Advanced Data Path with user configurable 3 stages consisting of a low-pass filter, low-pass / high-pass filter, and RMS engine.
- High Temperature Range -40°C to +105°C
- Integrated Free fall, Directional-Tap/Double-Tap™, and Device-orientation Algorithms
- Advanced Wake-Up and Back-to-Sleep detection with high-resolution threshold configurable down to 3.9mg
- Embedded 512-byte FIFO buffer with capability to record data even when being read
- User-selectable Output Data Rate up to 25600Hz
- User accessible manufacturer and part ID registers
The SparkFun Triple Axis Accelerometer Breakout is a simple Qwiic breakout for the KX132 digital accelerometer from Kionix. KX132 is a low power, 16 bit resolution three axis accelerometer w/ four user selectable acceleration measurement ranges of 2g/4g/8g/16g & has up to a 10kHz (max) output data rate making it ideal for a wide range of acceleration measurements as well as high speed applications such as vibration & tap sensing.
512 byte FIFO buffer that continues recording data while being read; Selectable Low Power or High Performance operating modes; Low Power with Integrated Voltage Regulator: High Performance Operating Current Consumption (400Hz ODR + Wake Up Detection): 148 A, Low Power Operating Current Consumption (0.781Hz ODR + Wake Up Detection): 0.53 A, Standby Current Consumption: 0.5 A
Self Test Functionality; Digital I2C up to 3.4MHz and Digital SPI up to 10MHz; 2x Qwiic Connectors; SPI available on PTH Header Pins; I2C Address: 0x1E (0x1F alternate)
Parts Required
| Name | Link | |
| Raspberry Pi Pico |  |
|
| KX132 |
|
|
| Connecting cables |  |
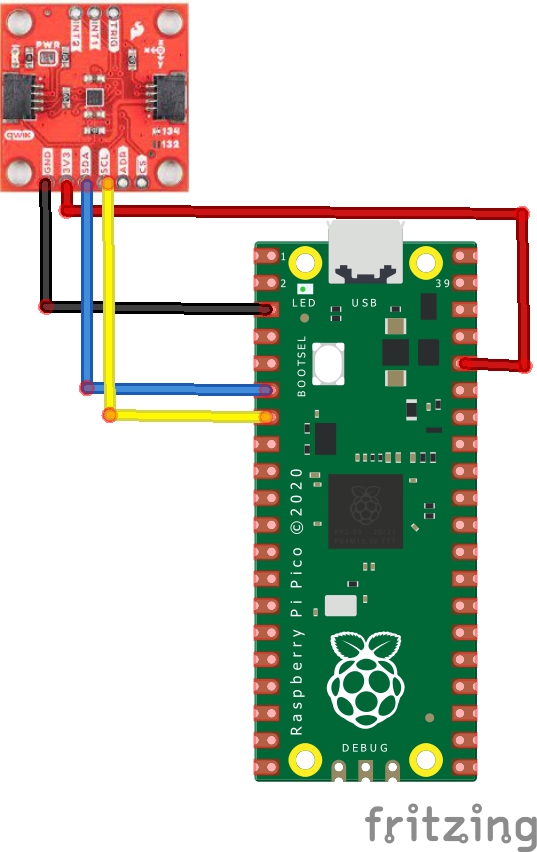
Schematic/Connection
Here is a layout in fritzing to show this
Code Example
I used the Sparkfun KX13X library and this is the default example which worked, there are several examples to experiment with
/*
  example1-BasicReadings

  This example shows the basic settings and functions for retrieving accelerometer
  data. Other possible Range settings, depending on your accelerometer KX132 or KX134, are
  the following:

  SFE_KX132_RANGE2G
  SFE_KX132_RANGE4G
  SFE_KX132_RANGE8G
  SFE_KX132_RANGE16G

  SFE_KX134_RANGE8G
  SFE_KX134_RANGE16G
  SFE_KX134_RANGE32G
  SFE_KX134_RANGE64G

  Written by Elias Santistevan @ SparkFun Electronics, October 2022

  Products:

  SparkFun Triple Axis Accelerometer Breakout - KX132:
    https://www.sparkfun.com/products/17871

  SparkFun Triple Axis Accelerometer Breakout - KX134:
    https://www.sparkfun.com/products/17589

  Repository:

    https://github.com/sparkfun/SparkFun_KX13X_Arduino_Library

  SparkFun code, firmware, and software is released under the MIT
  License	(http://opensource.org/licenses/MIT).
*/

#include <Wire.h>
#include <SparkFun_KX13X.h> // Click here to get the library: http://librarymanager/All#SparkFun_KX13X

SparkFun_KX132 kxAccel;
// SparkFun_KX134 kxAccel; // For the KX134, uncomment this and comment line above

outputData myData; // Struct for the accelerometer's data

void setup()
{

  Wire.begin();

  Serial.begin(115200);
  Serial.println("Welcome.");

  // Wait for the Serial monitor to be opened.
  while (!Serial)
    delay(50);

  if (!kxAccel.begin())
  {
    Serial.println("Could not communicate with the the KX13X. Freezing.");
    while (1)
      ;
  }

  Serial.println("Ready.");

  if (kxAccel.softwareReset())
    Serial.println("Reset.");

  // Give some time for the accelerometer to reset.
  // It needs two, but give it five for good measure.
  delay(5);

  // Many settings for KX13X can only be
  // applied when the accelerometer is powered down.
  // However there are many that can be changed "on-the-fly"
  // check datasheet for more info, or the comments in the
  // "...regs.h" file which specify which can be changed when.
  kxAccel.enableAccel(false);

  kxAccel.setRange(SFE_KX132_RANGE16G); // 16g Range
  // kxAccel.setRange(SFE_KX134_RANGE16G);         // 16g for the KX134

  kxAccel.enableDataEngine(); // Enables the bit that indicates data is ready.
  // kxAccel.setOutputDataRate(); // Default is 50Hz
  kxAccel.enableAccel();
}

void loop()
{
  // Check if data is ready.
  if (kxAccel.dataReady())
  {
    kxAccel.getAccelData(&myData);
    Serial.print("X: ");
    Serial.print(myData.xData, 4);
    Serial.print(" Y: ");
    Serial.print(myData.yData, 4);
    Serial.print(" Z: ");
    Serial.print(myData.zData, 4);
    Serial.println();
  }
  delay(200); // Delay should be 1/ODR (Output Data Rate), default is 1/50ODR
}
Output
Move the sensor in various directions to test
X: -0.4743 Y: 0.9409 Z: 0.1762
X: 0.0073 Y: 0.8203 Z: 0.2333
X: -0.2440 Y: 0.7379 Z: 0.2728
X: 0.1327 Y: 0.8457 Z: -0.9589
X: -0.0844 Y: 0.9218 Z: -0.2181
X: 0.8164 Y: 0.4870 Z: -0.2489
X: 0.2625 Y: 0.2938 Z: -0.7188
X: 0.1435 Y: -0.1830 Z: -1.1771
X: -0.2196 Y: -0.8481 Z: 0.3323
Links
https://github.com/sparkfun/SparkFun_KX13X_Arduino_Library
https://fscdn.rohm.com/kionix/en/datasheet/kx132-1211-e.pdf