In this article we connect a BMP280 barometric pressure sensor to a Raspberry Pi Pico running Circuitpython
Sensor Information
The BMP280 is an absolute barometric pressure sensor, which is especially feasible for mobile applications. Its small dimensions and its low power consumption allow for the implementation in battery-powered devices such as mobile phones, GPS modules or watches.
The BMP280 is based on Bosch’s proven piezo-resistive pressure sensor technology featuring high accuracy and linearity as well as long-term stability and high EMC robustness.
Numerous device operation options guarantee for highest flexibility. The device is optimized in terms of power consumption, resolution and filter performance.
| Parameter | Technical data |
|---|---|
| Operation range | Pressure: 300…1100 hPa Temperature: -40…85°C |
| Absolute accuracy (950…1050 hPa, 0…+40°C) |
~ ±1 hPa |
| Relative accuracy p = 700…900hPa (Temp. @ 25°C) |
± 0.12 hPa (typical) equivalent to ±1 m |
| Average typical current consumption (1 Hz data rate) | 3.4 μA @ 1 Hz |
| Average current consumption (1 Hz data refresh rate) | 2.74 μA, typical (ultra-low power mode) |
| Average current consumption in sleep mode | 0.1 μA |
| Average measurement time | 5.5 msec (ultra-low power preset) |
| Supply voltage VDDIO | 1.2 … 3.6 V |
| Supply voltage VDD | 1.71 … 3.6 V |
| Resolution of data | Pressure: 0.01 hPa ( < 10 cm) Temperature: 0.01° C |
| Temperature coefficient offset (+25°…+40°C @900hPa) |
1.5 Pa/K, equiv. to 12.6 cm/K |
| Interface | I²C and SPI |
Parts Required
| Name | Link |
| Pico | Raspberry Pi Pico Development Board |
| BMP280 | BMP280-5V Temperature Barometric Pressure Sensor Module |
| Connecting cables | Aliexpress link |
Schematic/Connection
Black for GND
Red for V+
Blue for SDA
Yellow for SCL
So color coded for ease of use, this layout shows a connection to the module
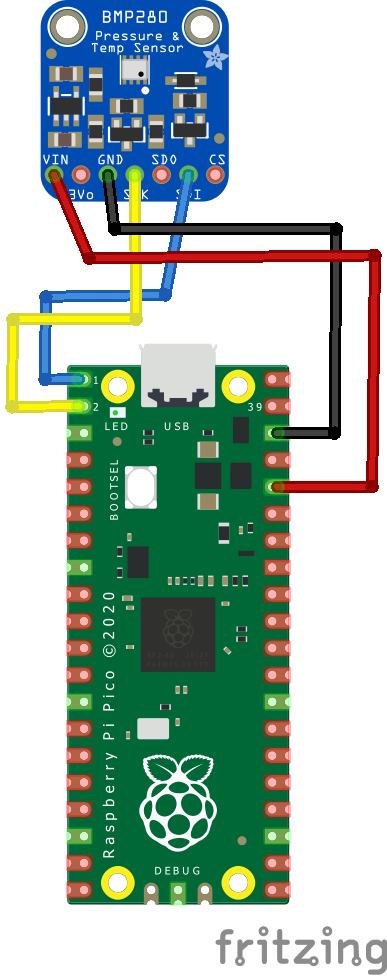
rp2040 and bmp280
Code Example
I used Thonny for development
The following is based on a library , I copied the adafruit_BMP280.mpy library for this device to the lib folder on my Raspberry Pi Pico – https://circuitpython.org/libraries
This is the basic example which comes with the library, my sensor had an I2C address of 0x76. If your sensor has a different one then you will need to change that line
[codesyntax lang=”python”]
import time
import board
import busio
import adafruit_bmp280

# Create sensor object, using the board's default I2C bus.
i2c = busio.I2C(board.GP1, board.GP0)  # SCL, SDA
bmp280 = adafruit_bmp280.Adafruit_BMP280_I2C(i2c,0x76)

# OR Create sensor object, communicating over the board's default SPI bus
# spi = board.SPI()
# bmp_cs = digitalio.DigitalInOut(board.D10)
# bmp280 = adafruit_bmp280.Adafruit_BMP280_SPI(spi, bmp_cs)

# change this to match the location's pressure (hPa) at sea level
bmp280.sea_level_pressure = 1013.25

while True:
    print("\nTemperature: %0.1f C" % bmp280.temperature)
    print("Pressure: %0.1f hPa" % bmp280.pressure)
    print("Altitude = %0.2f meters" % bmp280.altitude)
    time.sleep(2)
[/codesyntax]
Output
Here is what I saw in Thonny REPL window
Temperature: 18.0 C
Pressure: 1006.1 hPa
Altitude = 59.84 meters
Temperature: 24.7 C
Pressure: 1005.8 hPa
Altitude = 62.50 meters
Temperature: 25.3 C
Pressure: 1005.7 hPa
Altitude = 62.92 meters
Links