In this article we look at an accelerometer – this time its the MSA301 and we will connect this to a raspberry Pi Pico running Circuitpython
Lets look at some information regarding the sensor, this is from the datasheet
MSA301 is a triaxial, low-g accelerometer with I2C digital output for consumer applications.
It has dynamical user selectable full scales range of ±2g/±4g/±8g/±16g and allows acceleration measurements with output data rates from 1Hz to 500Hz
FEATURES
User selectable range, ±2g, ±4g, ±8g, ±16g
1.62V to 3.6V supply voltage,
1.2V to 3.6V IO supply voltage
User selectable data output rate
I2C Interface
One interrupt pin
14 bits resolution
This is the sensor that I bought
Parts Required
The sensor you can pick up in the $7 price range – you can connect to the sensor using a standard header the classic dupont style jumper wire.
I used a Qwiic cable – since a few sensors seem to use these but this is optional
| Name | Link |
| Pico | Raspberry Pi Pico Development Board |
| MSA301 | PIM456 Acceleration Sensor Development Tools MSA301 3DoF Motion Sensor Breakout |
| Connecting cables | Aliexpress product link |
Schematic/Connection
I used the Adafruit MSA301 sensor and in this case used the Stemma connection
For the STEMMA QT cables, it uses the Qwiic convention:
Black for GND
Red for V+
Blue for SDA
Yellow for SCL
So color coded for ease of use, this layout shows a connection to the module
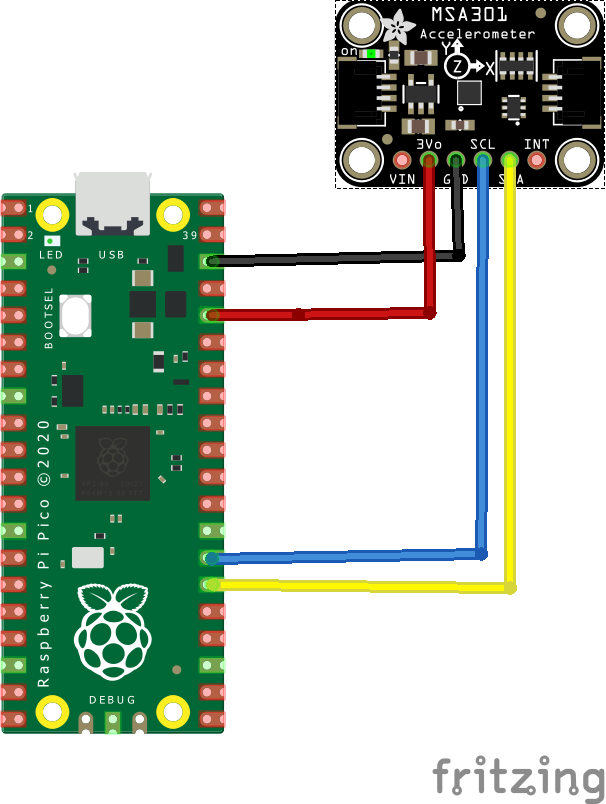
rp2040 and msa301 layout
Code Example
I used Thonny for development and I am using Circuitpython
You will need to download and install the latest circuitpython from the citrcuitpython download site
The following is based on a library which you can download the zip bundle from https://github.com/adafruit/Adafruit_CircuitPython_Bundle/releases
Before you continue make sure your board’s lib folder or root filesystem has the adafruit_msa301.mpy, adafruit_bus_device, and adafruit_register files and folders copied over on the RP2040 – https://circuitpython.org/libraries
This is the basic example which comes with the library
import time
import board
import busio
import adafruit_msa301

i2c = busio.I2C(scl=board.GP21, sda=board.GP20)
msa = adafruit_msa301.MSA301(i2c)

while True:
    print("%f %f %f" % msa.acceleration)
    time.sleep(0.5)
Output
Here is what I saw in Thonny REPL window
2.465865 -8.020046 0.110126
2.508958 -8.154114 1.805109
2.465865 -8.187630 1.604009
2.470653 -8.163689 1.527400
2.475441 -8.158901 1.388545
2.494594 -6.866117 2.422772
7.924284 -5.338717 -3.208018
This is the tap example
You may have to play about with the time.sleep(0.05) value, the original value was 0.01 but it seemed to be picking up multiple taps
import time
import board
import busio
import adafruit_msa301

i2c = busio.I2C(scl=board.GP21, sda=board.GP20)
msa = adafruit_msa301.MSA301(i2c)

msa.enable_tap_detection()

while True:
    if msa.tapped:
        print("Single Tap!")
    time.sleep(0.05)
Output
Here is what I saw in Thonny REPL window
Single Tap!
Single Tap!
Single Tap!
Links